As an avid fan of Spotify’s Discover Weekly playlist, I always wanted to have a scheduled, automated, self-controlled lean and cheap way of backing up the weekly generated tracks.
This post proposes a solution for tech-savvy Spotify fans, that uses
- python (including the spotipy module) to back up Spotify playlist tracks by copying them into another playlist,
- serverless Google cloud infrastructure (Cloud functions, Cloud scheduler, Cloud storage, Secret manager, Cloud monitoring, etc.) to schedule, run and monitor the code,
- terraform to manage the cloud infrastructure in code
- Github Actions to test and deploy the code
Keep in mind that this project may also be of interest to those who want to learn how to automate and schedule a Python function call using cloud infrastructure and infrastructure as code. However, if you are only interested in backing up your Discover Weekly playlist and are not interested in the proposed cloud infrastructure, there are simpler solutions available, such as third-party plugins that integrate directly with Spotify.
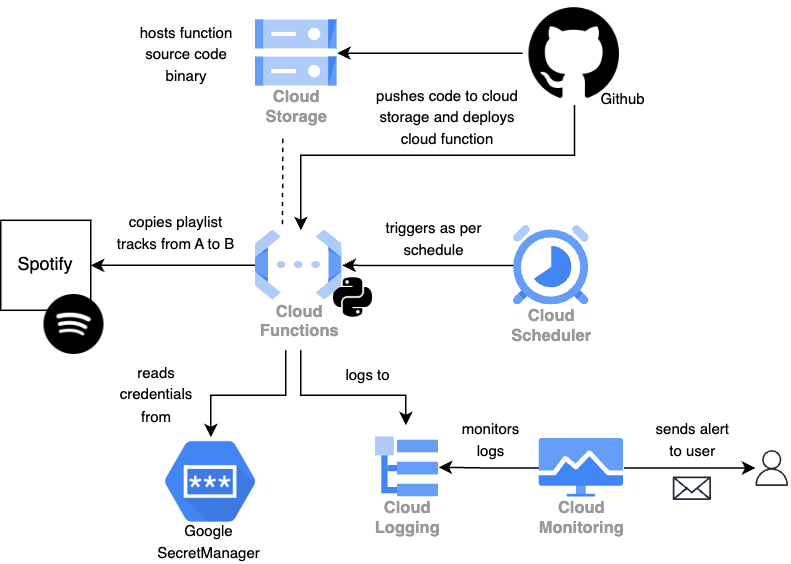
The code can be found on Github, stelsemeyer/discover-weekly-saver, and is structured in the following way:
app: The python code that is required to communicate with Spotify and copy the tracks from one playlist to anotherauth.py: A helper script to authenticate to Spotify via authorization code flowmain.py: The entrypoint for the Google Cloud Functionutils.py: All python code
.github/workflows: Github workflows to deploy or test the Cloud Functiondeploy.yml: Workflow to run a deployment and test it afterwardsintegration-test.yml: Workflow to run an integration test of HTTP endpoint and playlist logictest.yml: Workflow to run code linting and some unit tests found intests
terraform: All the terraform logic, divided into logical units (function, scheduler, deployment, etc.)tests: Unit tests using pytest
Prerequisites 🔗
- Existing Google Cloud project
- terraform (>=v1.3.4)
- python (>=3.10)
Setup 🔗
Short summary of what follows below in more detail:
- Create Spotify app in Spotify Developer Dashboard to create credentials to authenticate later on and identify playlist IDs.
- Apply terraform to create cloud infrastructure
- Run auth script to create and store refresh token in Google Secret, this equips the cloud function with access to the Spotify account.
- Configure Github for CI/CD
- Test cloud function locally via curl
1 Setting up Spotify 🔗
1a Authentication 🔗
As a first step, we need to create an app in the Spotify Developer dashboard. This will provide a client ID and client secret so that we can authenticate with the Spotify API.
To modify our private playlist, we will need to authenticate via the authorization code flow.
For this we also need to set up a redirect URI to, which we can achieve via Edit settings. In our case, http://localhost:8080 will work to run the authentication locally.
export SPOTIFY_CLIENT_ID="{your-spotify-client-id}"
export SPOTIFY_CLIENT_SECRET="{your-spotify-client-secret}"
export SPOTIFY_REDIRECT_URI="{your-spotify-redirect-uri}"
The authorization flow will provide us with access and refresh tokens, which we have to store securely. For this we can use Google Secret Manager. Via the refresh token, the spotipy library will be able to request new access tokens, which are usually valid for 1 hour. To achieve all this we will use a little helper script (see step 3).
1b Playlists 🔗
Moreover, we need to find out the IDs of our source playlist (Discover Weekly) as well as the destination playlist we want to insert the tracks into. You can get the ID either through the web app or within the installed app via right-clicking on the playlist and then Share -> Copy link to playlist.
The link looks like this: https://open.spotify.com/playlist/{id}.
export SOURCE_PLAYLIST_ID="{your-source-playlist-id}"
export DESTINATION_PLAYLIST_ID="{your-destination-playlist-secret}"
2 Creating the infrastructure 🔗
Before we start, we need to define three variables needed to create the resources.
We can define them in a terraform.tfvars file:
gcp_project_id = "{your-project-id}"
github_repo    = "{your-github-user-name}/{your-github-repo-name}"
alert_email    = "{your-email-address-for-alerts}"
We can then create our infrastructure via:
cd terraform
terraform plan
terraform apply
After roughly two minutes the infrastructure should be created:
Apply complete! Resources: 20 added, 0 changed, 0 destroyed.

Outputs:

cloud_function_bucket_name = "dw-saver-54a6"
cloud_function_name = "dw-saver"
cloud_function_secret_id = "dw-saver-token"
cloud_function_service_account = "dw-saver@{your-project-id}.iam.gserviceaccount.com"
cloud_function_url = "https://europe-west3-{your-project-id}.cloudfunctions.net/dw-saver"
deployment_service_account = "dw-saver-deployment@{your-project-id}.iam.gserviceaccount.com"
workload_identity_provider = "projects/{your-num-project-id}/locations/global/workloadIdentityPools/github-pool/providers/github-provider"
Straight after creation, the cloud function will not work properly yet, since we have not provided spotify client ID and secret nor the refresh and access token. We will generate these in the next step, step 3.
Optional: Importing already existing resources 🔗
If we have created the infrastructure before, we might want to import previously created long-living resources like the Workload Identity pool and provider beforehand:
terraform import google_iam_workload_identity_pool.deployment github-pool
terraform import google_iam_workload_identity_pool_provider.deployment github-pool/github-provider
terraform apply ...
3 Running the Spotify authorization code flow 🔗
With all environment variables in place locally, we can use our helper script to generate the refresh and access token and store them in Google Secret Manager.
This is achieved in the following way: The spotipy module allows to use different backends to cache the token to (file or memory are some of the defaults). We can implement a new class that uses Google Secrets (see GoogleSecretManagerCacheHandler in utils.py) and implements the interface from spotipy.cache_handler.CacheHandler.
class GoogleSecretManagerCacheHandler(CacheHandler):
    """An extension of the spotipy CacheHandler to handle the caching and retrieval of
    authorization tokens to and from Google Secret Manager."""

    def __init__(self, project_id: str = None, secret_id: str = None):
        if not project_id:
            project_id = os.environ["GCP_PROJECT_ID"]
        if not secret_id:
            secret_id = os.environ["GCP_SECRET_ID"]

        self.project_id = project_id
        self.secret_id = secret_id

    @property
    def _client(self) -> secretmanager.SecretManagerServiceClient:
        return secretmanager.SecretManagerServiceClient()

    @property
    def _parent(self):
        return f"projects/{self.project_id}/secrets/{self.secret_id}"

    def get_cached_token(self) -> str:
        name = f"{self._parent}/versions/latest"
        response = self._client.access_secret_version(name=name)
        return json.loads(response.payload.data.decode("UTF-8"))

    def save_token_to_cache(
        self, token_info: dict, delete_old_versions: bool = True
    ) -> None:
        logger.info("Saving token to cache.")
        data = json.dumps(token_info).encode("UTF-8")
        _ = self._client.add_secret_version(parent=self._parent, payload={"data": data})
        if delete_old_versions:
            self._delete_old_versions()
        return None

    def _delete_old_versions(self) -> None:
        """A helper to destroy old versions to reduce Secret storage cost."""
        logger.debug("Deleting old versions.")
        latest_version = self._client.get_secret_version(
            {"name": f"{self._parent}/versions/latest"}
        )
        logger.debug(f"Latest version is {latest_version.name}.")
        for version in self._client.list_secret_versions({"parent": self._parent}):
            if version.name != latest_version.name and version.state.name != "DESTROYED":  # fmt: skip
                logger.debug(f"Deleting version {version.name}.")
                try:
                    self._client.destroy_secret_version({"name": version.name})
                except FailedPrecondition:
                    logger.debug(f"Failed to delete version {version.name}.")
                    # Skip if already destroyed
                    pass
        return
This class is used in the helper script, which can be executed via:
SPOTIFY_CLIENT_ID=$SPOTIFY_CLIENT_ID \
  SPOTIFY_CLIENT_SECRET=$SPOTIFY_CLIENT_SECRET \
  SPOTIFY_REDIRECT_URI=$SPOTIFY_REDIRECT_URI \
  GCP_PROJECT_ID=$GCP_PROJECT_ID \
  GCP_SECRET_ID=$GCP_SECRET_ID \
  python app/auth.py
The script will ask you to authorize and give access rights to the application you just created in the first step.
We have still not provided Spotify access to our cloud function, which we will do in the next step.
4 Setting up CI/CD via Github actions 🔗
Since we plan to maintain this codebase in a serverless fashion, we can use Github actions to deploy and test the code and infrastructure.
To grant our deployment access to Spotify we have to add the Spotify credentials SPOTIFY_CLIENT_ID, SPOTIFY_CLIENT_SECRET, SPOTIFY_REDIRECT_URI to the repo secrets via Settings -> Secrets -> Actions.
To make the deployment work via Github Actions we need to specify a few more environment variables.
We can read these from the corresponding terraform outputs after we have run the terraform apply:
Outputs:

cloud_function_bucket_name = "dw-saver-54a6"
cloud_function_name = "dw-saver"
cloud_function_secret_id = "dw-saver-token"
cloud_function_service_account = "dw-saver@{your-project-id}.iam.gserviceaccount.com"
cloud_function_url = "https://europe-west3-{your-project-id}.cloudfunctions.net/dw-saver"
deployment_service_account = "dw-saver-deployment@{your-project-id}.iam.gserviceaccount.com"
workload_identity_provider = "projects/{your-num-project-id}/locations/global/workloadIdentityPools/github-pool/providers/github-provider"
Alternatively, we can fetch these programmatically via the terraform output command:
cd terraform
export CLOUD_FUNCTION_URL=$(terraform output -raw cloud_function_url)
export CLOUD_FUNCTION_BUCKET_NAME=$(terraform output -raw cloud_function_bucket_name)
export CLOUD_FUNCTION_SERVICE_ACCOUNT=$(terraform output -raw cloud_function_secret_id)
export CLOUD_FUNCTION_SECRET_ID=$(terraform output -raw cloud_function_service_account)
...
If we add these to the Github deploy workflow we can use Github actions to do the deployment using gcloud CLI and eventually test it:
# add deploy.yml
5 Testing the cloud function 🔗
We can ping the public cloud function endpoint, which requires authentication, and should receive an OK:
export CLOUD_FUNCTION_URL=$(cd terraform && terraform output -raw cloud_function_url)
curl \
  --silent \
  -X POST \
  $CLOUD_FUNCTION_URL \
  -H "Authorization: bearer $(gcloud auth print-identity-token)" \
  -H "Content-Type: application/json" \
  -d '{}'
Development & testing 🔗
1 Testing the cloud function locally 🔗
We can test the cloud function end-to-end locally before deployment using the functions-framework.
If we want to test the Spotify integration, we need to make sure we have access to the secret. This can be checked via
gcloud secrets \
  versions access latest \
  --secret=$CLOUD_FUNCTION_SECRET_ID \
  --impersonate-service-account=$CLOUD_FUNCTION_SERVICE_ACCOUNT
We can start the function in the background (using the ampersand)
pip install functions-framework
functions-framework --target copy_tracks --port 8765 &
and then send request via
curl -X POST localhost:8765 -d '{}'
More on this to be found in a Google blog post How to develop and test your Cloud Functions locally.
2 Setting up tests 🔗
We can set up above test in a programmatic way and by mocking the relevant parts or by using dry-run functionality, again either
- by using the functions framework or by
- testing the python function itself
Since our cloud function is idempotent and invocations come with almost no cost, we can also run test using the real infrastructure, either by
- invoking the function locally but using the Spotify credentials from Google cloud, see test-integration.yml,
- invoking the remote cloud function using the http endpoint and curl, see deploy.yml
Teardown 🔗
1 Emptying the bucket 🔗
You can delete all objects in the bucket via
gsutil rm -a gs://${CLOUD_FUNCTION_BUCKET_NAME}/**
2 Destroying the infrastructure 🔗
We can destroy all infrastructure using a simple terraform destroy, but there is a drawback: Since Workload Identity pools and providers are soft-deleted and recreating them under the same name is blocked for 30 days, we may want to remove the pool and provider state first, in case we want to apply the infrastructure again:
cd terraform
terraform state rm google_iam_workload_identity_pool.deployment
terraform state rm google_iam_workload_identity_pool_provider.deployment
terraform destroy
If we do not bother, a simple terraform destroy will do though.
Cost 🔗
As of 2022-12-27, the cloud infrastructure cost for Cloud Function, Cloud Storage, Cloud Scheduler are below 0.01$ per month and within the free tiers, if deployments are done moderately (few a week) and schedule is reasonable (few times a week).
Only potential cost driver are the Secrets, if multiple versions are kept active (i.e. undestroyed). Since the refresh token produces new versions regularly, versions can add up and produce low but increasing cost exceeding the free tier. Thus there is a method (see _delete_old_versions in utils.py) to destroy old secret versions, which is invoked by default once the secret has been updated.
Miscellaneous 🔗
We can update the environment variables used in the cloud function deployment “in-place” (will still trigger a new deployment) via
gcloud functions deploy \
  --region=europe-west3 \
  discover-weekly-saver \
  --update-env-vars \
  GCP_SECRET_ID=${GCP_SECRET_ID} \
  ...
We can also improve the project in the following ways:
- To make the project completely “serverless”, the Terraform deployment could be moved into CI/CD, i.e. Github actions, for ex. using atlantis.
- For full reproducibility, the python code could be put into Docker. More on this to be found in another blogpost: Building a serverless, containerized batch prediction model using Google Cloud Run, Pub/Sub, Cloud Storage and Terraform.
- For better testing a staging environment could be added, and we could also use staging Spotify client or even staging playlists (as there is only one Spotify environment).
- Since Secrets does not seem to be made for frequently changing credentials (as it is an immutable cache that adds new versions) a different cache could be used. Alternatively, the token could be encrypted using a static token and then stored in cloud storage or another key value store.
- Secrets could also be used for the Spotify client ID and secret.
- Terraform code could be modularized and a remote backend for the terraform state could be used.
Troubleshooting & common errors 🔗
-
NotFound: 404 Secret [projects/{your-project-id}/secrets/dw-saver-token] not found or has no versions: You need to create the secret version first. This can be achieved by running the authentication script (see setup step 3) on your local machine. -
Error creating Job: googleapi: Error 409: Job projects/{your-project-id}/locations/europe-west3/jobs/{something} already exists: This may be a race condition between resources. Usually resolved by runningterraform applyagain. -
Trouble getting Workload Identity running remotely: Alternatively you can generate identity (not access!) tokens manually using the
gcloudCLI:token=$(gcloud \ auth print-identity-token \ --impersonate-service-account=$CLOUD_FUNCTION_SERVICE_ACCOUNT \ --include-email) response=$(curl \ --silent \ -m 310 \ -X POST \ $CLOUD_FUNCTION_URL \ -H "Authorization: bearer ${token}" \ -H "Content-Type: application/json" \ -d '{}') -
Error: could not handle the request: Check cloud function logs in cloud console, usually a problem in the cloud function’s python code itself. -
You can verify the token stored in Google Secret Manager using the
GoogleSecretManagerCacheHandler:from utils import GoogleSecretManagerCacheHandler cache_handler = GoogleSecretManagerCacheHandler( project_id=GCP_PROJECT_ID, secret_id=GCP_SECRET_ID ) cache_handler.get_cached_token() -
End-of-central-directory signature not found. Either this file is not..: Setgzipingoogle-github-actions/upload-cloud-storagetofalse(trueby default) -
You can restore a deleted Workload Identity pool or provider via cloud console via
IAM & Admin > Workload Identity Federation