The goal of this post is a to set up a serverless infrastructure, managed in code, to serve batch predictions of a machine learning model or any other lightweight computation in an asynchronous way: A Google Cloud Run service will listen for new files in a Cloud Storage bucket via Pub/Sub message topic, trigger a computational process and put the resulting data into another bucket. You can find the full code on GitHub. The service will work as easy as:
# upload data
gsutil cp dataset.csv gs://input-bucket/dataset.csv

# wait a few seconds.. and download predictions
gsutil cp gs://output-bucket/dataset.csv predictions.csv
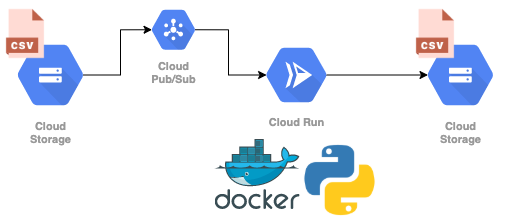
As in the previous post, we will make use of Terraform to manage our infrastructure, including Google Cloud Run, Storage and Pub/Sub. Moreover we will use a simple time series forecasting script as an example, which we will actually train on the fly, as the fitting time is low. In general, Cloud Run is not made to execute long-running tasks (due to service timeouts, more on this later), but perfect to run small scripts in an asynchronous way.
Alternatively we could compute batch-predictions from a pre-trained machine learning model that is loaded from external storage or served from an external API, for example to classify images or documents. We could also run a simple script to generate some plots.
We will make use of the following services:
- Google Cloud Run is a service to run invokable containers on a serverless infrastructure.
- Google Pub/Sub is a asynchronous messaging service which allows decoupling of sender and receiver of messages.
- Google Cloud Storage is a service to store objects.
- Terraform is a infrastructure-as-code software.
- facebook prophet is a time series forecasting package.
Prerequisites 🔗
We use Terraform v0.14.0 and gcloud (here: Google Cloud SDK 319.0.0, alpha 2020.11.13, beta 2020.11.13, bq 2.0.62, core 2020.11.13, gsutil 4.55).
We need authenticate to Google to set up the infrastructure using Terraform. We will use the interactive workflow:
gcloud auth application-default login
Once we are authenticated, we can start terraforming and use gsutil to interact with Google Cloud Storage to test our infrastructure once it is set up. In a production environment we should create a service account for Terraform.
Creating a containerized model 🔗
Let us build a very simple containerized workflow. We will use prophet to produce time series forecasts. As already mentioned, we will actually fit the model on the fly and produce batch-predictions, without storing the actual model. This is feasible, because the fitting time of the model is quite low. Alternatively we can use a pre-trained model, either an external service or by pulling a simple model artifact from external storage. This is especially useful when the model training is computationally expensive and will be done somewhere else.
Our model consist of the following files, which we will all put in the app subfolder:
model.py: the actual model code, including the fit and batch-predict.main.py: the Cloud Runner handler, a Flask endpoint to handle requestsDockerfile: the Dockerfile for the app containerbuild.sh: a simple script to build the containerpush.sh: a simple script to push the container to GCR
The model.py will contain a function to fit and predict using fbprophet.Prophet:
import logging
import pandas as pd

from fbprophet import Prophet


log = logging.getLogger()


def forecast(df: pd.DataFrame, periods=28) -> pd.DataFrame:
	log.info("Processing input.")

	df.columns = [col.lower() for col in df.columns]

	# rename according to prophets naming convention
	data = df.rename({"date": "ds"}, axis=1)
	data["ds"] = pd.to_datetime(data["ds"])

	log.info("Fitting model.")
	model = Prophet()
	model.fit(data)

	log.info("Computing predictions.")
	future_df = model.make_future_dataframe(periods=periods, include_history=False)
	forecast_df = model.predict(future_df)

	log.info("Processing output.")
	forecast_df = forecast_df.rename({"ds": "date", "yhat": "prediction"}, axis=1)
	forecast_df = forecast_df[["date", "prediction"]]

	return forecast_df
The handler, the main.py will handle requests and forward them to our model using Flask:
import base64
import os
import json
import pandas as pd
import logging

from flask import Flask, request
from model import forecast


OUTPUT_BUCKET = os.environ.get("OUTPUT_BUCKET").replace("gs://", "")


log = logging.getLogger()
app = Flask(__name__)


@app.route("/", methods=["POST"])
def index():
    # https://cloud.google.com/storage/docs/json_api/v1/objects
    envelope = request.get_json()

    if not envelope:
        msg = "No message received"
        log.error(f"Error: {msg}")
        return f"Bad Request: {msg}", 400

    if not isinstance(envelope, dict) or "message" not in envelope:
        msg = "Invalid message format"
        log.error(f"Error: {msg}")
        return f"Bad Request: {msg}", 400

    message = envelope["message"]

    data = {}
    if isinstance(message, dict) and "data" in message:
        payload = base64.b64decode(message["data"]).decode("utf-8").strip()
        data = json.loads(payload)

    log.info(f"Data received: {data}")

    bucket = data["bucket"]
    name = data["name"]

    input_file = f"gs://{bucket}/{name}"
    log.info(f"Input file: {input_file}")
    input_df = pd.read_csv(input_file)

    output_df = forecast(input_df)

    output_file = f"gs://{OUTPUT_BUCKET}/{name}"
    log.info(f"Output file: {output_file}")
    output_df.to_csv(output_file, index=False)

    return ("", 204)
We will put all this into Docker using the following python:3.8 base image:
FROM python:3.8

# Allow statements and log messages to immediately appear in the Cloud Run logs
ENV PYTHONUNBUFFERED True

COPY requirements.txt .
RUN pip install -r requirements.txt

ENV APP_HOME /app
WORKDIR $APP_HOME
COPY model.py main.py ./

CMD exec gunicorn --bind :$PORT --workers 1 --threads 1 --timeout 0 main:app
The build.sh looks like follows:
#!/bin/bash

# if required: gcloud auth configure-docker
docker build -t cloud-runner .
Finally the push.sh:
#!/bin/bash

docker tag cloud-runner $IMAGE_URI
docker push $IMAGE_URI
Creating our infrastructure. 🔗
We can now plan our infrastructure. The properly organized Terraform code can be found within the GitHub repository.
We have to plan the following services:
- the Cloud Run service to process files from the input bucket
- the Cloud Storage notifications to listen to new files in the input bucket
- the Pub/Sub topic for the Cloud Storage notifications
- the Pub/Sub subscription to subscribe the Cloud Run service to the Cloud Storage notifications topic
- the app container to be used by Cloud Run
Around this we need to define some service accounts and IAM.
We start with variables.tf:
variable "billing_account_name" {
  # needs to be the literal name
  # default = "Mein Rechnungskonto"
}

variable "user" {
  # your user email address, xy@gmail.com
  # default = "xy@gmail.com"
}

locals {
  project_name = "cloud-runner"
  # suffix project (id) with some random id to avoid namespace clashes
  project = "${local.project_name}-${random_id.id.hex}"
  region  = "europe-west3"

  service_name  = "cloud-runner-service"
  input_bucket  = "cloud-runner-input-bucket"
  output_bucket = "cloud-runner-output-bucket"

  image_name = "gcr.io/${local.project}/cloud-runner"
  image_tag  = "latest"
  image_uri  = "${local.image_name}:${local.image_tag}"
}

resource "random_id" "id" {
  byte_length = 2
}
The following Terraform code will be put into main.tf. We need to define provider and project-related resources.
provider "google" {
  project = local.project
  region  = local.region
}

data "google_billing_account" "account" {
  # this needs to be the literal name
  display_name = var.billing_account_name
}

resource "google_project" "project" {
  name            = local.project_name
  project_id      = local.project
  billing_account = data.google_billing_account.account.id
}

resource "google_project_iam_member" "project_owner" {
  role   = "roles/owner"
  member = "user:${var.user}"

  depends_on = [
    google_project.project,
  ]
}
Moreover GCS buckets:
resource "google_storage_bucket" "storage_input_bucket" {
  name = local.input_bucket

  depends_on = [
    google_project_iam_member.project_owner,
  ]
}

resource "google_storage_bucket" "storage_output_bucket" {
  name = local.output_bucket

  depends_on = [
    google_project_iam_member.project_owner,
  ]
}
Let us take a look at the Cloud Run service. Because the Cloud Run service can only be built if the image is available on GCR, we will use a null_resource to build the image and make this a dependency.
resource "google_project_service" "cloud_run_service" {
  service = "run.googleapis.com"

  depends_on = [
    google_project.project,
  ]
}

resource "google_cloud_run_service" "cloud_run_service" {
  name     = local.service_name
  location = local.region

  template {
    spec {
      # container can only handle one request at a time
      container_concurrency = 1

      containers {
        image = local.image_uri

        resources {
          limits = {
            cpu    = "2000m"
            memory = "2048Mi"
          }
        }

        env {
          name  = "OUTPUT_BUCKET"
          value = google_storage_bucket.storage_output_bucket.url
        }
      }
    }
  }

  traffic {
    percent         = 100
    latest_revision = true
  }

  depends_on = [
    google_project.project,
    google_project_service.cloud_run_service,
    null_resource.app_container,
  ]
}

# use null resource provisioner to build initial image which is required by runner
resource "null_resource" "app_container" {
  provisioner "local-exec" {
    command = "(cd ../app && ./build.sh && IMAGE_URI=${local.image_uri} ./push.sh)"
  }

  depends_on = [
    google_project.project,
  ]
}

resource "google_service_account" "service_account" {
  account_id = "cloud-runner-service-account"

  depends_on = [
    google_project_iam_member.project_owner,
  ]
}

resource "google_cloud_run_service_iam_member" "iam_member" {
  service  = google_cloud_run_service.cloud_run_service.name
  location = google_cloud_run_service.cloud_run_service.location
  role     = "roles/run.invoker"
  member   = "serviceAccount:${google_service_account.service_account.email}"
}
Finally the Storage notifications and Pub/Sub infrastructure:
resource "google_storage_notification" "storage_notification" {
  bucket         = google_storage_bucket.storage_input_bucket.name
  payload_format = "JSON_API_V1"
  topic          = google_pubsub_topic.pubsub_topic.id
  # only watch out for new objects being successfully created
  event_types    = ["OBJECT_FINALIZE"]

  depends_on = [
    google_pubsub_topic_iam_binding.iam_binding,
  ]
}

// enable notifications by giving the correct IAM permission to the unique service account.
data "google_storage_project_service_account" "gcs_account" {
  depends_on = [
    google_project.project,
  ]
}

resource "google_pubsub_topic_iam_binding" "iam_binding" {
  topic   = google_pubsub_topic.pubsub_topic.id
  role    = "roles/pubsub.publisher"
  members = ["serviceAccount:${data.google_storage_project_service_account.gcs_account.email_address}"]

  depends_on = [
    google_pubsub_topic.pubsub_topic,
  ]
}
// end enabling notifications

resource "google_pubsub_topic" "pubsub_topic" {
  name = "cloud-runner-topic"

  depends_on = [
    google_project_iam_member.project_owner,
  ]
}

resource "google_pubsub_subscription" "pubsub_subcription" {
  name  = "cloud-runner-subscription"
  topic = google_pubsub_topic.pubsub_topic.name

  ack_deadline_seconds = 600

  retry_policy {
    minimum_backoff = "60s"
    maximum_backoff = "600s"
  }

  push_config {
    push_endpoint = google_cloud_run_service.cloud_run_service.status[0].url

    attributes = {
      x-goog-version = "v1"
    }

    # service to service auth, as this is not deployed publicly
    oidc_token {
      service_account_email = google_service_account.service_account.email
    }
  }

  depends_on = [
    google_project.project,
  ]
}

# service account for cloud run to work properly
resource "google_project_iam_binding" "project" {
  role = "roles/iam.serviceAccountTokenCreator"
  members = [
    "serviceAccount:service-${google_project.project.number}@gcp-sa-pubsub.iam.gserviceaccount.com",
  ]

  depends_on = [
    google_pubsub_subscription.pubsub_subcription,
  ]
}
We can now build our infrastructure using our setup script: setup.sh. This will
- build the container once so its available in cache
- initialize and apply Terraform
If you want to see the plan first, run terraform plan instead of terraform apply.
#!/bin/bash

# build container once to enable caching
(cd app &&
	./build.sh)

# init and apply terraform
(cd terraform &&
	terraform init &&
	terraform apply)
We will be prompted for the billing_account_name and user. Alternatively we can prepare a terraform.tfvars file and add the values there:
billing_account_name = ...
user                 = ...
We should see something like the following output (truncated) until we are asked to confirm the terraform apply:
[+] Building 0.8s (10/10) FINISHED
 => [internal] load build definition from Dockerfile
...

Terraform has been successfully initialized!
...

Plan: 15 to add, 0 to change, 0 to destroy.

Changes to Outputs:
  + image_uri     = (known after apply)
  + input_bucket  = "cloud-runner-input-bucket"
  + output_bucket = "cloud-runner-output-bucket"
  + project_id    = (known after apply)
  + service_name  = "cloud-runner-service"

Do you want to perform these actions?
  Terraform will perform the actions described above.
  Only 'yes' will be accepted to approve.
The creation of resources should take around 3 to 5 minutes, also depending on the available upload bandwidth, as we need to upload the image to the registry. Once done we should see the following outputs (truncated):
random_id.id: Creating...
random_id.id: Creation complete after 0s [id=zg0]
google_project.project: Creating...
google_project.project: Still creating... [10s elapsed]
google_project.project: Still creating... [20s elapsed]
google_project.project: Still creating... [30s elapsed]
google_project.project: Creation complete after 35s [id=projects/cloud-runner-ce0d]
data.google_storage_project_service_account.gcs_account: Reading.
...

google_cloud_run_service_iam_member.iam_member: Creation complete after 16s [id=v1/projects/cloud-runner-ce0d/locations/europe-west3/services/cloud-runner-service/roles/run.invoker/serviceAccount:cloud-runner-service-account@cloud-runner-ce0d.iam.gserviceaccount.com]
google_project_iam_binding.project: Still creating... [10s elapsed]
google_project_iam_binding.project: Still creating... [20s elapsed]
google_project_iam_binding.project: Creation complete after 22s [id=cloud-runner-ce0d/roles/iam.serviceAccountTokenCreator]

Apply complete! Resources: 15 added, 0 changed, 0 destroyed.

Outputs:

image_uri = "gcr.io/cloud-runner-ce0d/cloud-runner:latest"
input_bucket = "cloud-runner-input-bucket"
output_bucket = "cloud-runner-output-bucket"
project_id = "cloud-runner-ce0d"
service_name = "cloud-runner-service"
These outputs will be useful when we want to test our service. We can for example fetch the input bucket name as follows: terraform output -json | jq -r .input_bucket.value
Testing the infrastructure 🔗
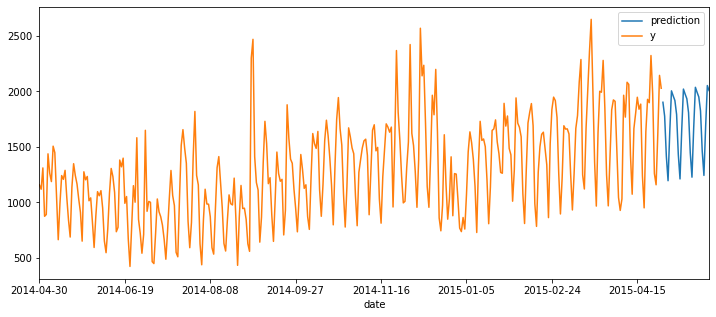
Since our prototype contains a very simple implementation of facebook’s prophet package, let’s run a time series forecast on a small dataset, the hyndsight dataset. It contains the daily pageviews of Rob J. Hyndman’s blog from 2014-04-30 to 2015-04-29. Rob J. Hyndman is the author of many popular R forecast packages (including forecast), author of numerous books and research papers and a forecasting expert. The time series in the dataset shows a prominent weekly pattern and upward trend, which we will see below.
We can upload the test file app/data/hyndsight.csv to GCS using gsutil. We will fetch input and output bucket name from the terraform output and extract them using jq:
INPUT_BUCKET=$(cd terraform && terraform output -json | jq -r .input_bucket.value)
OUTPUT_BUCKET=$(cd terraform && terraform output -json | jq -r .output_bucket.value)

gsutil cp app/data/hyndsight.csv gs://${INPUT_BUCKET}/hyndsight.csv
We can check on the file using gsutil -q stat gs://${OUTPUT_BUCKET}/hyndsight.csv, which should be there after 10 to 20 seconds. We can view the logs in the Cloud Run console:
gsutil cp gs://${OUTPUT_BUCKET}/hyndsight.csv app/data/hyndsight_forecast.csv
import pandas as pd

actual = pd.read_csv("app/data/hyndsight.csv")
forecast = pd.read_csv("app/data/hyndsight_forecast.csv")

data = pd.concat([actual, forecast])

data.plot(x="date", figsize=(12,5))
INPUT_BUCKET=$(cd terraform && terraform output -json | jq -r .input_bucket.value)

for i in {1..100}
do
	echo "Copying: $i"
  gsutil -q cp gs://${INPUT_BUCKET}/hyndsight gs://${INPUT_BUCKET}/dataset_${i}.csv
done
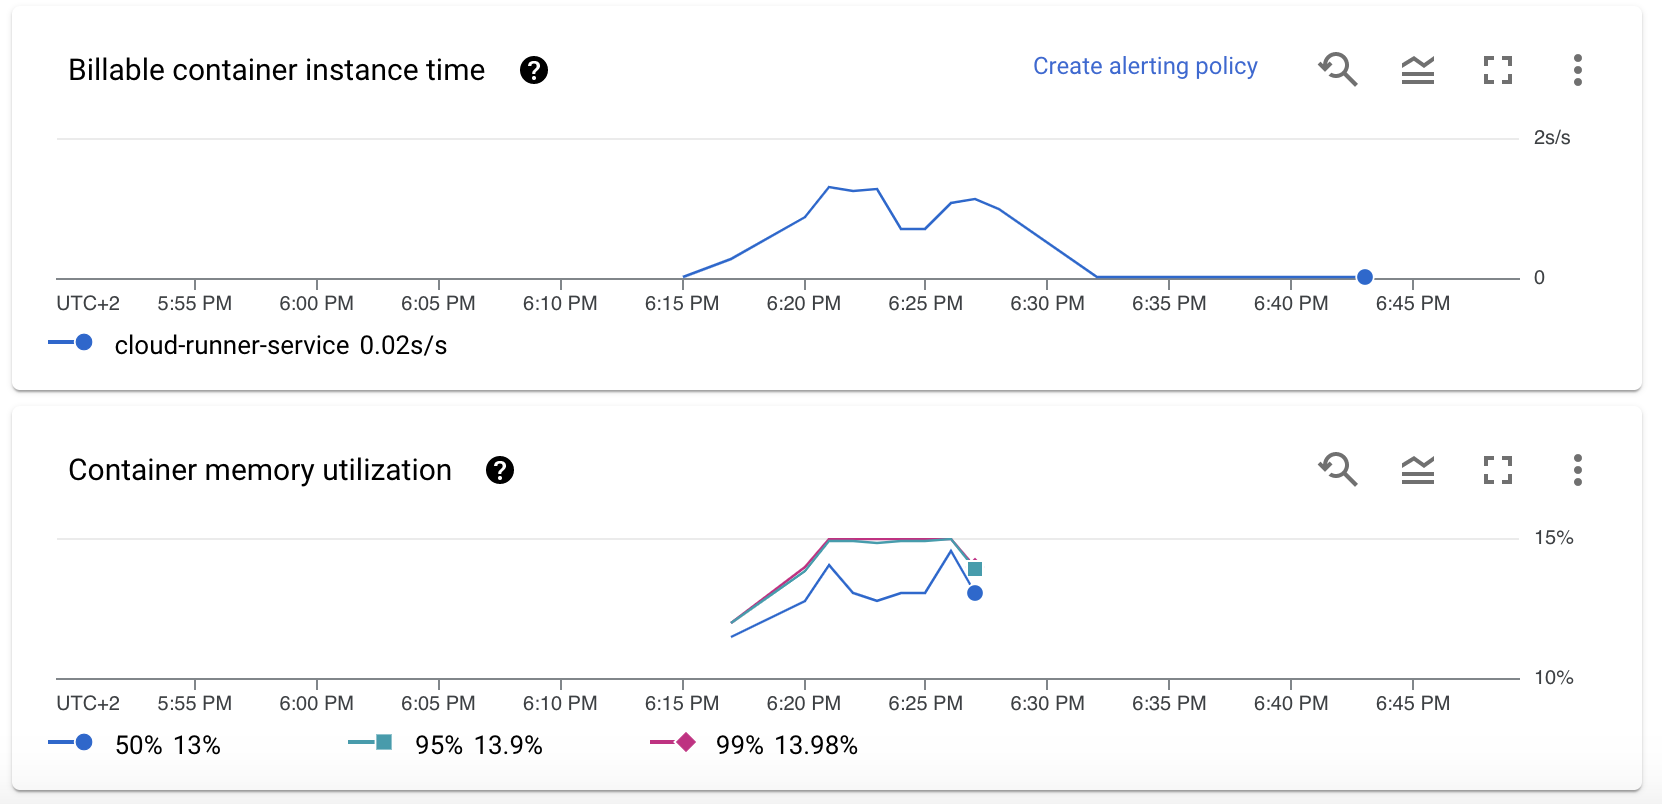
We can check out the number of requests per second, latency per request (run time of our model), number of instances:
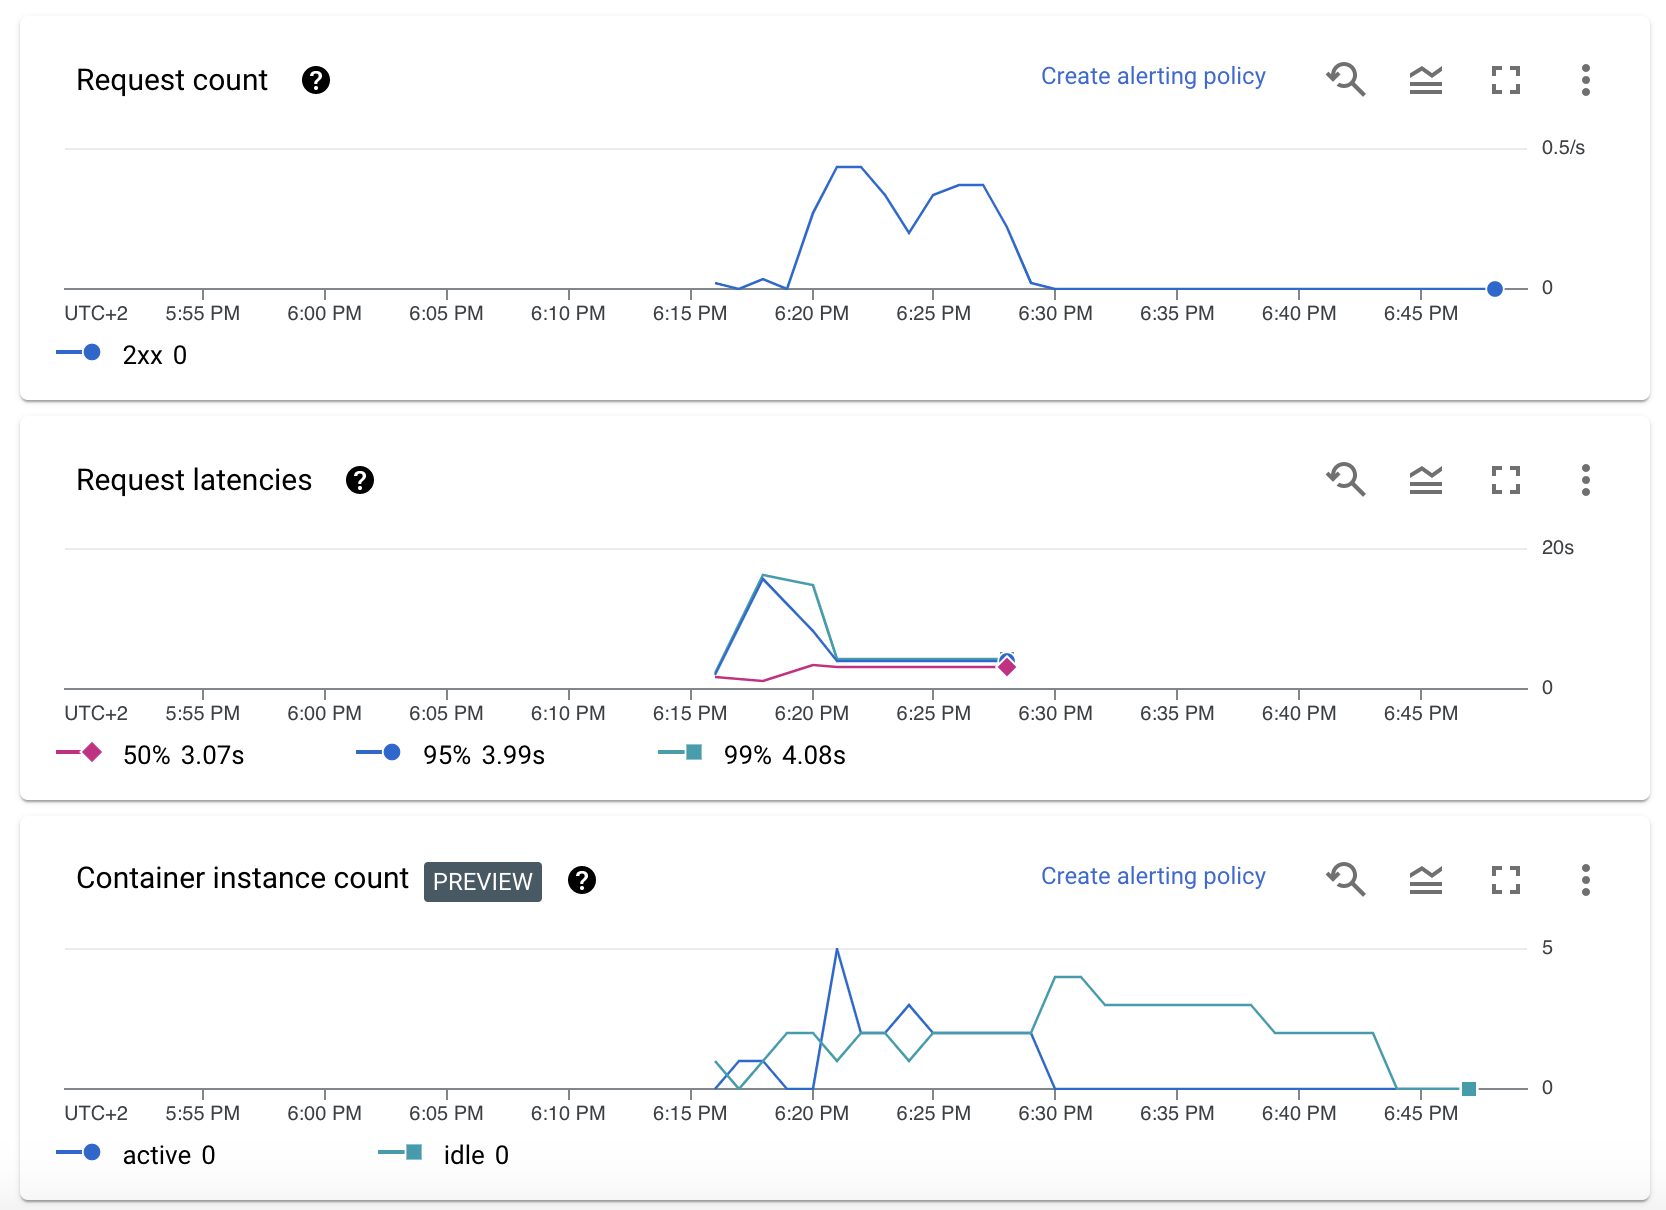
Moreover we see that the memory usage of the container is very low (for our dataset), so we could potentially use smaller instances if we expect input data to look similar.
Updating the container 🔗
To manually update the container with a new latest version we can use the deploy.sh script. We need to to rebuild and push the image, update the Cloud Run service to pick it up and shift traffic.
# get project id, image output and service name from terraform output
PROJECT_ID=$(cd terraform && terraform output -json | jq -r .project_id.value)
IMAGE_URI=$(cd terraform && terraform output -json | jq -r .image_uri.value)
SERVICE_NAME=$(cd terraform && terraform output -json | jq -r .service_name.value)

# build and push image
(cd app &&
	./build.sh &&
	IMAGE_URI=$IMAGE_URI ./push.sh)

# update image
gcloud --project $PROJECT_ID \
	run services update $SERVICE_NAME \
	--image $IMAGE_URI \
	--platform managed \
	--region europe-west3

# send traffic to latest
gcloud --project $PROJECT_ID \
	run services update-traffic $SERVICE_NAME \
	--platform managed \
	--region europe-west3 \
	--to-latest
Destroying the infrastructure 🔗
We can use the _destroy.sh which empties the buckets and destroys the resources created through Terraform.
#!/bin/bash

# get bucket names from terraform output
INPUT_BUCKET=$(cd terraform && terraform output -json | jq -r .input_bucket.value)
OUTPUT_BUCKET=$(cd terraform && terraform output -json | jq -r .output_bucket.value)

gsutil rm "gs://${INPUT_BUCKET}/**"
gsutil rm "gs://${OUTPUT_BUCKET}/**"

(cd terraform &&
	terraform state rm "google_project_iam_member.project_owner" &&
	terraform destroy)
...
google_service_account.service_account: Destruction complete after 1s
google_storage_bucket.storage_output_bucket: Destruction complete after 1s
google_pubsub_topic.pubsub_topic: Destruction complete after 2s
google_project_service.cloud_run_service: Still destroying... [id=cloud-runner-ce0d/run.googleapis.com, 10s elapsed]
google_project_service.cloud_run_service: Destruction complete after 13s
google_project.project: Destroying... [id=projects/cloud-runner-ce0d]
google_project.project: Destruction complete after 3s
random_id.id: Destroying... [id=KM8]
random_id.id: Destruction complete after 0s

Destroy complete! Resources: 14 destroyed.
More remarks 🔗
The Google services have some limitations (as of 2021-04-24). There is for example a maximum timeout of 15 minutes, Google Pub/Sub has a maximum acknowledge time of 10 minutes. This makes it useless for more time-consuming tasks. You can use bigger resources though to speed up the processing time, though there is also a limit on the memory we can provision. Our script can only handle one request at a time, therefore we set the container concurrency to 1. We can speed up the process by using more threads within the container and allow some parallelization.
In any case, Cloud Run natively handles multiple requests by using multiple containers. The maximum number of parallel Cloud Run containers is also configurable, and by default set to 1000(!).
Instead of uploading the data to the buckets directly we should rather upload some kind of manifest containing an identifier, the path to the input data, an expected path for output data. This would make the integration into other services easier. Additionally we could also pass parameters to the model. Make sure to always use two different buckets for input and output, otherwise there will be a continuous loop when output files are stored in the input bucket.
Moreover some aspects of this project have been designed in a very naive way and need to be revisited for a production environment: the versioning of the Cloud Run images, where proper version tags should be used. Cloud Run has a mechanism to shift traffic to different versions.
Lastly, you have to consider the cost of this setup. The above setup and a handful of test runs is within free tiers (as of 2021-04-24). Cost scales with minimum amount of containers available at all time, container resources, number of requests and run time per request. You can use the cost calculator to estimate the expected costs. Cost heavily goes up if you require containers to be there at all time or need much more resources.
Conclusion 🔗
Using serverless architecture in combination with Terraform allows us to spawn simple end to end machine learning services, while maintaining visibility and control over the infrastructure through code. Personally, I prefer managing infrastructure in code much more compared to using cloud consoles and UIs. In the past, this was often a blocker for me to use serverless infrastructure, as the Terraform modules often lag behind.
If you use Cloud Run, you get some must-have and nice-to-have features out of the box: monitoring of requests and resources, logging, upscaling. Using Pub/Sub will make sure that retries and dead letters are handled properly. In case a more generic setup is desired, for example without the Pub/Sub integration, Cloud Functions instead of Cloud Run may be considered, as they allow for more flexibility on the invocation part.
The containerization allows us to isolate the machine learning code and properly maintain package dependencies if needed. If we keep the handler code to a minimum, we can test the image carefully and make sure our development environment is very close to the production infrastructure. At the same time we are not locked into Google technology; we can theoretically deploy the handler into our own infrastructure, using any other queue or message system.
Nevertheless, we cannot hide the fact that we are using proprietary software, which meets some average requirements rather than the ones of our exact use case. We can only configure what the service allows us to, and in our case we have to resign to some limitations of Cloud Run and Pub/Sub, for example regarding timeouts, maximum runtime and resources.